SIMON SAYS STAMP MONDAY CHALLENGE DESIGNER SPOTLIGHT - LAST WEEK


Ciao e ben ritrovati a tutti! E' arrivata anche l'ultima settimana da guest designer da Simon Says Stamp.com... il tempo è davvero volato! E' stata un'esperienza davvero importante, emozionante ed impegnativa, ma sempre molto divertente! Mi sono sentita accolta dalla gentilissima Dt Family della Simon Says Stamp Monday challenge. Sono davvero grata a Lorraine per avermi supportata in questa meravigliosa avventura. E' stato un onore! Grazie!
Bando alle ciance! E' di nuovo lunedì, e come ogni lunedì è tempo per una nuova sfida... giocate anche voi: potrete essere estratti a radom e vincere un buono da 50$ da spendere nel meraviglioso negozio di Simon Says Stamp.com!
Hello and welcome to everyone! The last week of guest designer Simon Says Stamp.com has arrived too ... time has really flown! It was a really important, exciting and challenging experience, but always a lot of fun! I felt welcomed by the very kind Dt Family of the Simon Says Stamp Monday challenge. I'm really grateful to Lorraine for supporting me on this adventure. It was an honor! Thank you!
No more talking! It's Monday again, and like every Monday it's time for a new challenge ... play for you too: you can be drawn radomly and win a $ 50 voucher to spend in the wonderful Simon Says Stamp.com store!
No more talking! It's Monday again, and like every Monday it's time for a new challenge ... play for you too: you can be drawn radomly and win a $ 50 voucher to spend in the wonderful Simon Says Stamp.com store!

Simon dice: monocromatico ( usa le sfumature di un unico colore)
Simon Says: MONOCHROME (use only shades of one color)
Il gioco di questa settimana è creare utilizzando un solo colore con le sue sfumature. Quando ho letto questo "vincolo" mi sono un po' spaventata... ero convinta di trovarmi molto in difficoltà visto che sono abituata a giocare con più colori.
Mentre pensavo al progetto ho iniziato a disegnare e pian piano è nato lui: una mostruosissimo 😉😁 ragnetto peloso. Con il pennarello della FABER CASTELL Pitt artist pen "S" ho riportato il disegno sulla carta da acquerello della Canson da 300 gr.
Mentre pensavo al progetto ho iniziato a disegnare e pian piano è nato lui: una mostruosissimo 😉😁 ragnetto peloso. Con il pennarello della FABER CASTELL Pitt artist pen "S" ho riportato il disegno sulla carta da acquerello della Canson da 300 gr.
This week's game is to create using only one color with its nuances. When I read this "bond" I was a bit scared ... I believed that I was very distressed because I'm used to playing with more colors.
While I was thinking about the project I started to draw and slowly he was born: a very monstrous 😉hairy spider. With the marker FABER CASTELL Pitt artist pen "S" I reported the drawing on the Canson watercolor paper 300 gr.
While I was thinking about the project I started to draw and slowly he was born: a very monstrous 😉hairy spider. With the marker FABER CASTELL Pitt artist pen "S" I reported the drawing on the Canson watercolor paper 300 gr.


To paint it I used the Distress Ink Walnut Stain, Vintage photo, Gathered Twigs, Brushed corduroy diluted with water.


Il mostruoso ragnetto ha bisogno di una ragnatela, ma come realizzarla? Pensa e ripensa a come fare i fili... ma si! La colla a caldo!
Disegno sulla carta da forno un paio di ragnatele e con la pistola e la colla a caldo, seguendo il disegno tracciato, realizzo la forma. Quando la colla si è raffreddata, delicatamente stacco la ragnatela dalla carta forno e successivamente la ritaglio con la forbice adattandola alla misura necessaria.
The little spider needs a spider's web, but how to make it? Think and think about how to do the wires ... but yes! Hot glue!
Drawing on a sheet of baking paper a couple of spider webs and with a hot glue gun, following the drawing lines, I realize the shape. When the glue has cooled, I gently remove the cobweb from the baking paper and then cut it with the scissors adapting it to the necessary size.


Bene ora ho un ragno e una ragnatela...che ne faccio? Il tema di Halloween ormai è scontato!
Per base utilizzo una scatolina di cartone da riciclo.
Incollo una garza lungo il bordo del coperchio, inserisco dentro l'altra parte della scatola, e le unisco con la Tacky Glue.
Well now I have a spider and a spider web ... what do I do? The Halloween theme is now obvious!
For the base use a box of recycled cardboard.
Paste a gauze along the edge of the lid, insert inside the other part of the box, and paste them with the Tacky Glue.


On a Kraft paper with modeling paste and a "wall" stencil effect, I create the background that I stick on the base of the box.


Ricopro il tutto con il Soft Matte Gel Art Basic per impermeabilizzare lo sfondo, e asciugo bene con l'embosser
I cover everything with the Soft Matte Gel Art Basic to waterproof the background, and dry with the embosser.


Copro tutto il bordo della scatola utilizzando una spatola con l'Heavy Gesso white. asciugo bene con l'embosser.
I cover the whole edge of the box using a spatula with the Heavy Gesso white. I dry well with the embosser.

Coloro "il muro" con il Distress Oxide Walnut stain, attivandolo con uno spruzzino riempito d'acqua. Passo anche i bordi con l'aiuto di uno blending tool.
I paint the wall with the Distress Oxide Walnut stain, activating it with a spray filled with water. I also pass the edges with the blending tool.

Ricopro completamente la base della led tea light con lo scotch biadesivo, sul quale posiziono uno semplice spago, ed un pezzettino sfilacciato di garza. Coloro con Distress Gathered Twigs.
Halloween is not Halloween without a pumpkin ... maybe lit from within. I'm looking for some ideas to inspire me in Pinterest and ... but look a bit '... a led, a ping pong ball ... this is for me ... I slightly modified the project and here is my scary pumpkin ready to keep my spider on the spider's web:
I completely cover the base of the led tea light with the double sided tape, on which I place a simple string, and a frayed piece of gauze. Paint with Distress Gathered Twigs


Con un taglierino foro la base della pallina da Ping Pong, e la "incarto"con la Tissue paper POSTALE di Tim Holtz . Lego con lo spago la carta stringendo i lacci sulla parte opposta al foro, e taglio l'eccesso. Con il DISTRESS INK WALNUT STAIN E RUSTY HINGE diluiti con qualche goccia d'acqua, coloro la zucca. Ritaglio due triangolini e la bocca da un cartoncino nero, e con la Mod Podge ed un pennello li incollo alla testa. Sempre con la Mod Podge ed un pennello passo tutta la testa della zucca.
Ora non mi resta che infilare il led nel foro della pallina, e, incollarla alla base.
With a hole cutter the base of the Ping Pong ball, and I wrap it with Tim Holtz's POSTAL POST paper. I tie the paper by tightening the laces on the side opposite the hole, and cut the excess. With the DISTRESS INK WALNUT STAIN AND RUSTY HINGE diluted with a few drops of water, I paint the pumpkin . I cut out two little triangles and the mouth from a black cardboard, and with the Mod Podge and a brush I glue them to the head. Always with the Mod Podge and a brush step the whole pumpkin head.
Now I just have to put the led in the hole of the ball, and stick it to the base.


Può mancare la scopa per la strega? Ovviamente no ... ecco, è pronta! Prendo un bastoncino trovato al parco e lego ad una sua estremità dei fili di corda sfilacciata. Con la forbice taglio l'eccesso e tingo il tutto con il DISTRESS INK BRUSHED CORDUROY.
But how can a witch's broom miss? It obviously can't ... here it is!
I take a small stick found in the park, and tie at one end of it the threads of frayed rope. With the scissors cut the excess and dye it all with the BRUSHED CORDUROY DISTRESS INK.


Per finire serve un calendario per segnare la data della festa di Halloween!
Su un cartoncino di carta Kraft colore naturale, stampo un timbro quadrettato e "Ottobre" con il DISTRESS INK BRUSHED CORDUROY.
Lo ritaglio e con il PAPER DISTRESSER logoro i suoi bordi.
Da un Paper pad della Crate Paper ritaglio un caldendario di ottobre, passo i bordi con il PAPER DISTRESSER, e lo invecchio con il DISTRESS INK VINTAGE PHOTO.
On a card of Kraft paper in natural color, I mold a squared stamp and "October" with the DISTRESS INK BRUSHED CORDUROY.
Cropping it and with the PAPER DISTRESSER worn its edges.
From a Paper Pad in the Crate Paper, I cut out a calendar of October, I pass the edges with the PAPER DISTRESSER, and I copy it with the DISTRESS INK VINTAGE PHOTO.


Finalmente posso completare la mia shadow box di Halloween.
Con delle puntine da disegno fisso le due ragnatele nella parte frontale e nel retro della scatolina.
Finally I can complete my Halloween shadow box.
The two spider webs on the front and on the back of the box are fixed with pins.


Incollo i vari elementi, aggiungo alcuni stickers Tim Holtz Idea-ology "OCCASIONS", dopo averli posizionati su un cartoncino e attaccati alla base con il nastro biadesivo spessorato. Aggiungo alcuni baccelli di fiori selvatici trovati in giardino e dei ramoscelli. Nell'angolo in basso a destra creo una piccola base di cartone dove, con il biadesivo attacchero' la zucca, avendo l'avvertenza di lasciare scoperta la parte dell'interrutore del led.
Paste the various elements, add some stickers Tim Holtz Idea-ology "OCCASIONS", after placing them on a cardboard and attached to the base with the double-sided adhesive tape. I add some pods of wild flowers found in the garden and some twigs. In the lower right corner I create a small cardboard base where, with the adhesive tape I attack the pumpkin, having the warning to leave the part of the led switch uncovered.


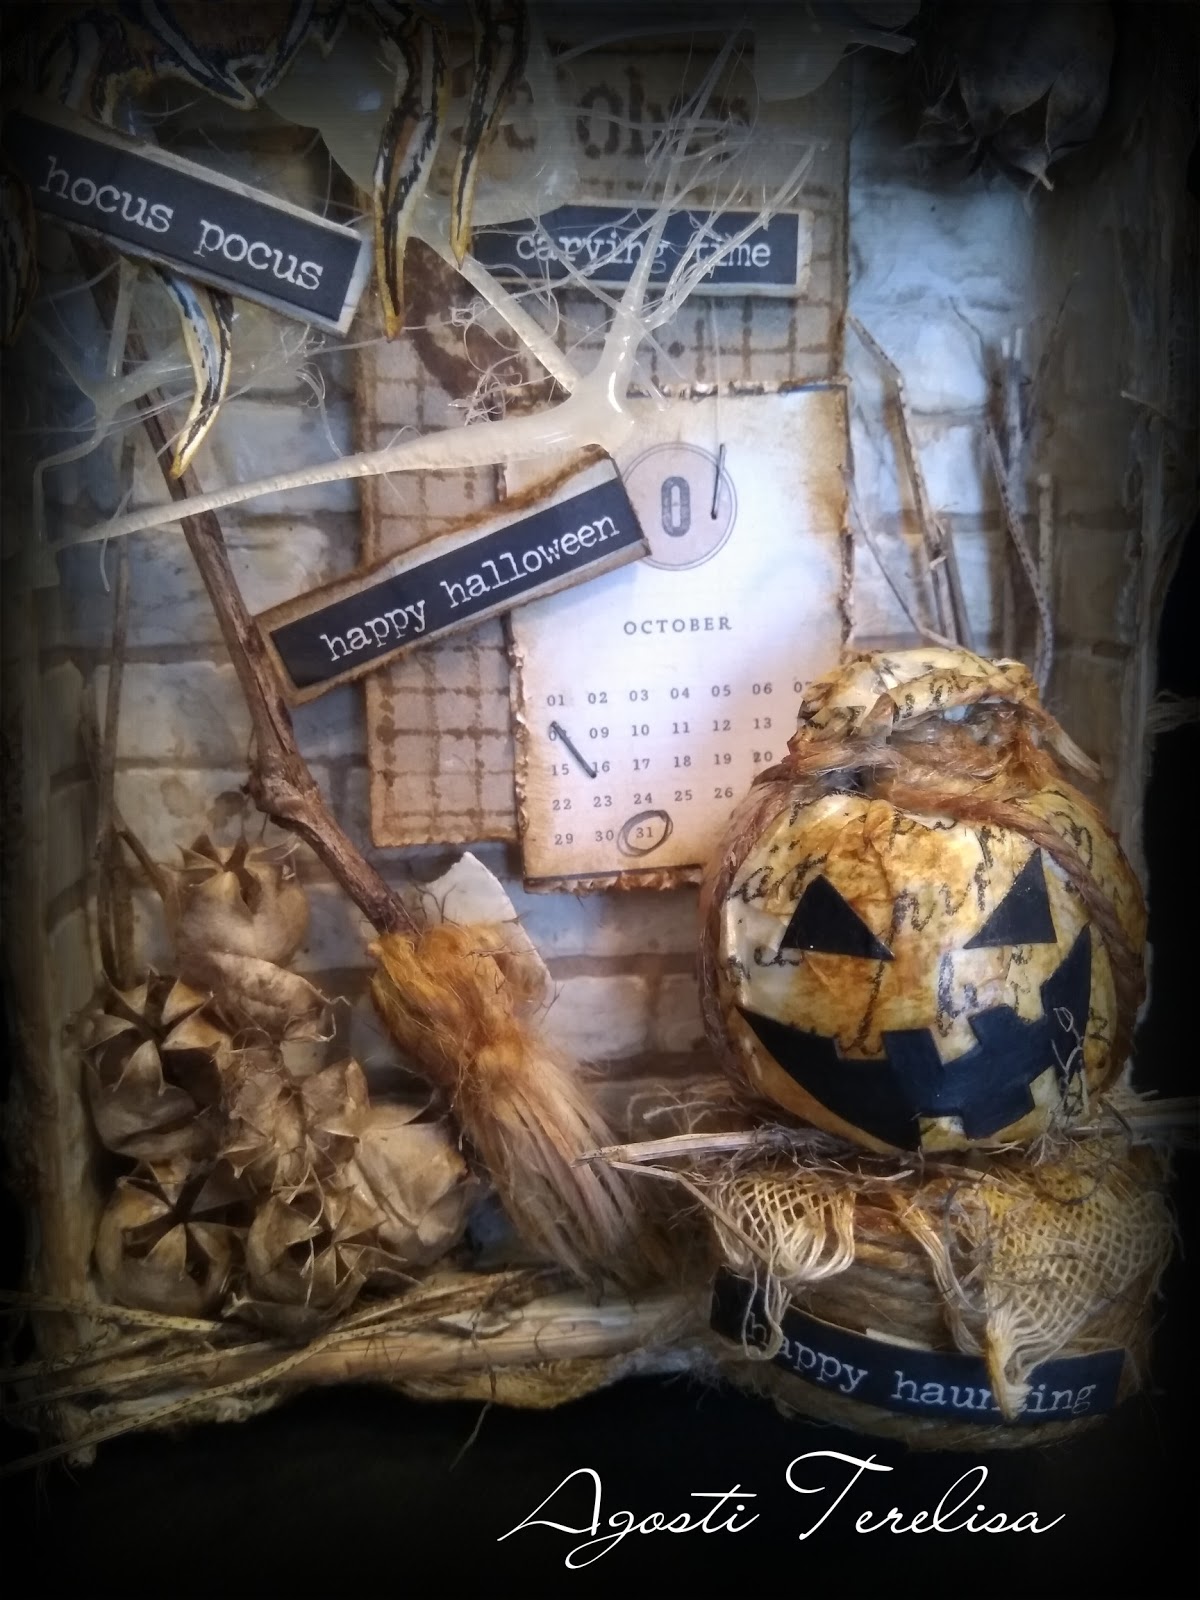

Bene....ora accendete la zucca e spegnete le luci.. che brrrividi di pauuuuraaa.😧😁😂
Well .... now turn on the pumpkin and turn off the lights .. that shivers of fear 😧😁😂


Il mio progetto "MONOCHROME" sfumature colore marrone è terminato.
Spero come sempre di esservi stata di ispirazione, vi ringrazio di essere passati nella mia biglietTERRYa auguro a tutti voi BUONA VITA!
A presto!
Terry
My "MONOCHROME"brown shades project is finished.
I hope as always to have been inspiring you, I thank you for having passed through my card. I wish you all GOOD LIFE!
See you soon and bye bye Simon says stamp monday challenge dt family!😘😘😘
Terry

Partecipa anche te! Potrai vincere un buono ad estrazione da 50$ da spendere nel favoloso store di SIMON SAYS STAMP.com!
Tutto quello che devi fare è creare un progetto seguendo il tema della settimana e aggiungere un collegamento a Inlinkz ! Puoi iscriverti 5 volte in modo da avere 5 possibilità di vincere! ECCEZIONALE !! Tutti i vincitori sono scelti a caso, quindi ognuno ha le stesse possibilità di vincere! Buona fortuna a tutti! Il team di progettazione non vede l'ora di vedere le tue creazioni e farà il giro per visitarti al più presto., e se hai bisogno di ispirazioni vieni a vedere i progetti del meraviglioso Design team.
Hope you enjoyed this project as much as I did while creating it, please do check this Amazing Design Team for furtherinspiration! We look forward to see what you'll create, remember that you could win a $50 voucher to spend in Simon Says Stamp Store.
All you have to do is take out your crafty supplies, make something following this week’s prompt, and add a link in the Inlinkz at the bottom of this post! You can join 5 times so you could have 5 chances to win! How AWESOME is that!!
All winners are chosen randomly, so everyone has an equal chance to win! Woo Hoo!! Good Luck to everyone! The Design Team is looking forward to seeing your crafty makes and will pop around to visit you ASAP!

Tutti i prodotti che ho usato sono disponibili su https://www.simonsaysstamp.com/
e sono elencati di seguito.
All the products I used, are available from /https://www.simonsaysstamp.com/
and are listed below.

my supplies for "MONOCHROME":
 |  |  |  |  |
 |  |  |  |  |
 |  |  |  |  |

This is a wonderful creation, it's fresh and fun and full of creative imagination! I applaud your effort and have enjoyed seeing your work on the SSS Monday challenge.
RispondiEliminathank you so much Beulah! You're so kind!😘😘
EliminaFantastic!
RispondiEliminaThank you a bunch Marci!
EliminaCosa posso dire se non geniale? Bravissima amica mia, queste tue settimane come guest designers sono state illuminate da progetti bellissimi! ❤
RispondiEliminaOcchio che ora esco dallo smartphone e ti abbraccio stretta! Grazie per il sostegno tesoraaaa mia😘😘
EliminaUn progetto più bello dell'altro! Complimenti!!
RispondiEliminaMa grazie! Gentilissima!
EliminaOh my, I am so panic at spiders but yours is even cute due to those big cute eyes, I guess :-) So great to watch the steps of your creation and see the final result. Thank you for sharing and being with us during this whole month with your lovely projects! See you there! Hugs, Macarena
RispondiEliminaQuesto commento è stato eliminato dall'autore.
EliminaMacarena me too spiders are scary ... this is my way to overcome it: imagine it ridiculous😉😅. Thanks for everything Macarena, it was a pleasure to participate!
EliminaSee you soon! 😘😘😘
Questo commento è stato eliminato dall'autore.
RispondiEliminaI abolutely LOVE this plaque Terelisa!! your spider is super scary and the little light up pumpkin is awesome!! So fabulously spooky!!
RispondiEliminaThank you so much for all of your fabulous creations that you have made for us this month! It has been a real pleasure to have you along with us and I hope we get to do this again soon XXX
Hope you have a great weekend!
luv
Lols x x x
Dear Lorraine participate was a great gift for me. Thank you very much for wanting to me of the dt. Believe me it was a really meaningful and important experience. And be sure you do not give up! I will continue to follow you, to be inspired by the monday challenge and to look at your wonderful creations!
EliminaA kiss! See you soon 😊😊
so sad that this is your last week Terelisa and you are certainly going out with a bang with your amazing projects. It's been an absolute pleasure having you join us and I hope you'll be back soon, hugs kath xxx
RispondiEliminaThank you from the heart Kath! You have always been very kind to me. Commitments allowing on Monday I will play again with you, because the challenges you propose are always stimulating, and I learn a lot from your work and tutorials. A big big kiss! And a huge THANK YOU for everything!
EliminaSee you soon ... indeed soon!
❤️❤️
Wow, wow, wow! What an incredible piece of art! I loved seeing the creation process behind this masterpiece and was impressed at all the different techniques you used. I enjoyed each of your projects so much and am so glad you joined us as a guest designer!
RispondiEliminaOhh dear Andrea thank you a bunch! 😘😘😘😘
EliminaSono davvero stupefatta! la tua creatività è davvero enorme e anche fuori dagli schemi e trovo sia una cosa assolutamente meravigliosa! bellissimo progetto come tutti quelli che ci hai mostrato in questo mese, è stato un piacere e un onore averti con noi! barbara
RispondiEliminaGrazie Barbara... Anche per me è stato davvero un piacere ed una grande emozione! Grazie per ip supporto tecnico e morale che mi hai dato...ero spaventatissima, ma tu hai saputo darmi le dritte per affrontare il tutto. Grazie di cuore !😘😘😘😘
EliminaHaving you over this month has been a blast! you rocked it and you created stunning projects!! This last one is one of them!!I hope you had fun, till next time!
RispondiEliminax Zoey
Zoey you're a sweetheart! Thank you! I had fun, excited and amazed by your welcome. Sometimes it was difficult because I have little material and I had to improvise and redo some projects ... but the fun has always been there! Thanks for everything! See you soon!
Elimina